Self-hosting this site on a Raspberry Pi with CloudFlare Tunnel
Published on 2024-09-08
Docker WebTech IoT NetworkingNow that I have my Raspberry Pi setup, it's time to move this website (boring-is-good.com) to Pi.
Previously, I was hosting my site on Amazon Web Service with Elastic Container Service. At that time, it was an obvious choice because I am familiar with cloud services offered by AWS. But I have an eventual goal of self-hosting. Frankly, I am just tired of paying monthly subscription fee to AWS. And now, this self-hosting plan has materialized with my newly purchased Raspberry Pi. Yayy! I know my Raspberry Pi is currently operating on a microSD card as a storage device and this is not the best solution for scaling, but that is okay. Because - A: my site is packaged in a docker container, and B: I am going to use Cloudflare zero trust tunnel for exposing my local service to the Internet.
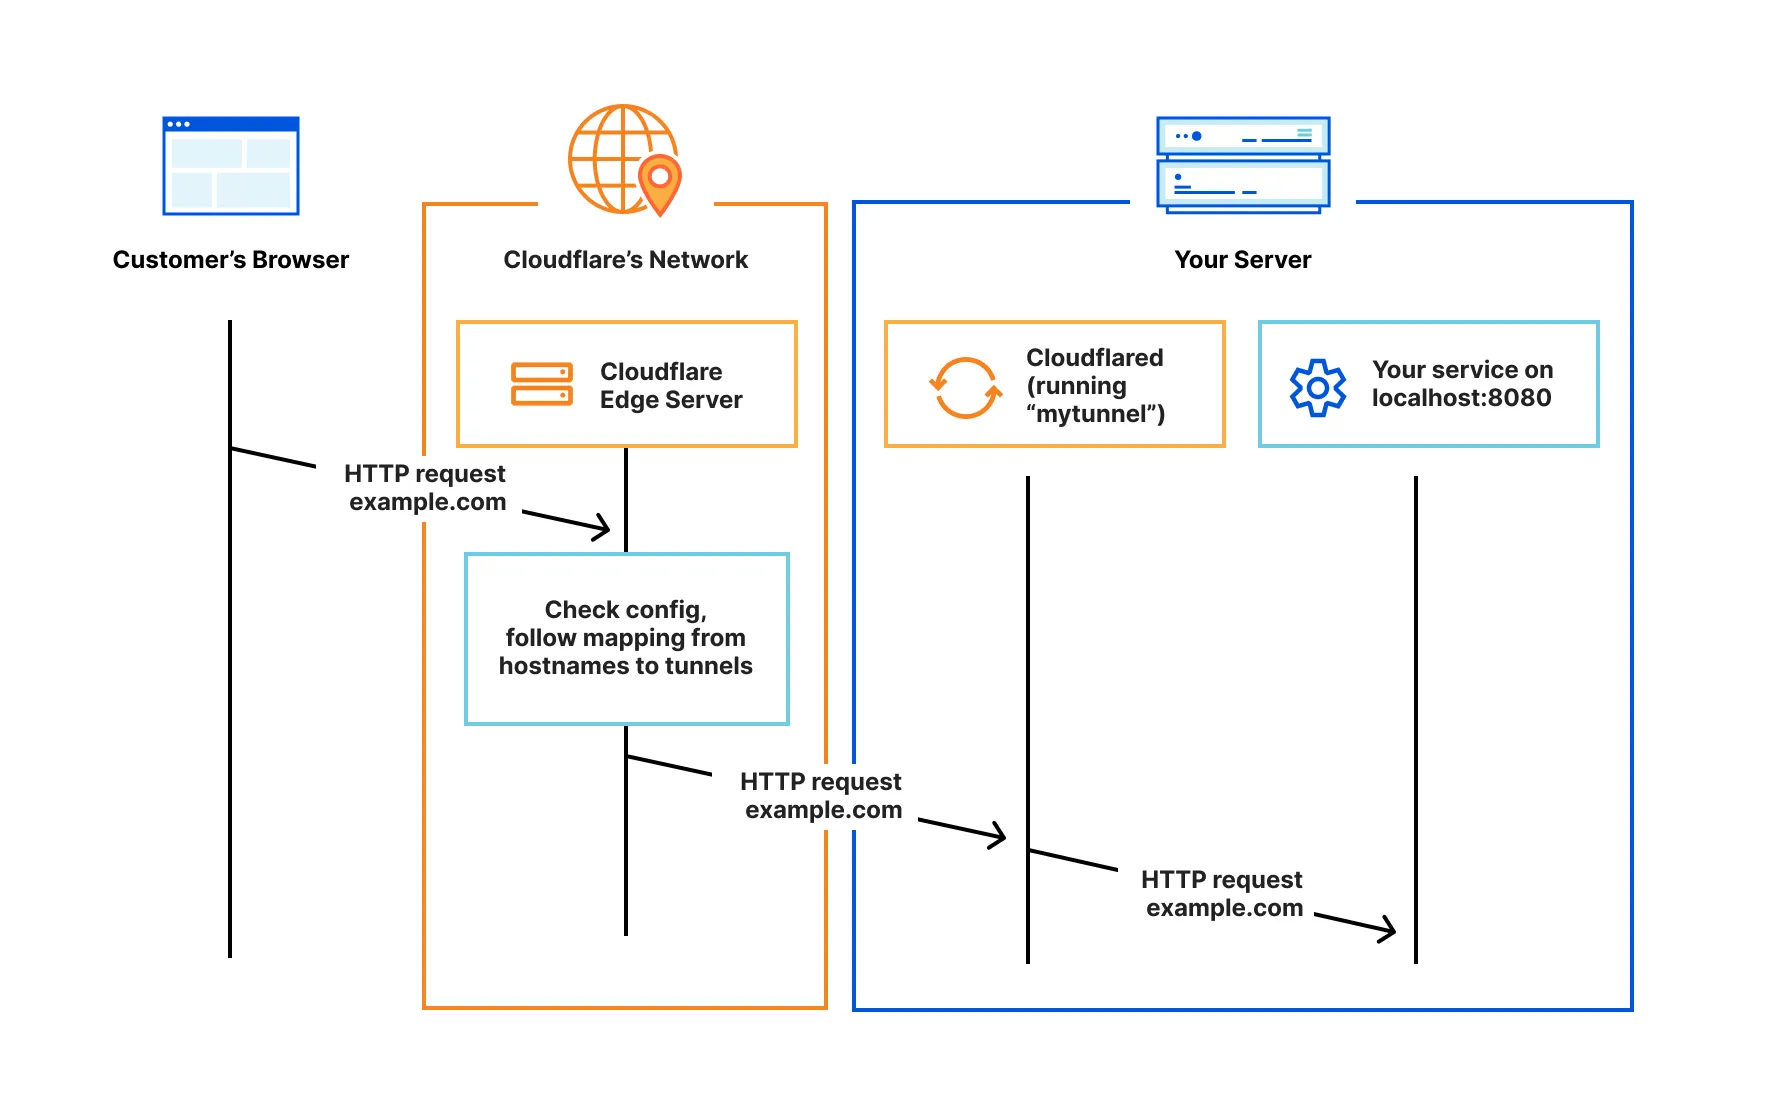
Cloudflare Zero Tunnel provides the reverse proxy service, plus additional Zero Trust Security Model and features like DDoS protection and Web Application Firewall (WAF). That means no request is trusted by default, and access to applications is based on identity, context, and policy, rather than network location. It creates a secure communication tunnel between the local machine and Cloudflare’s edge network, allowing us to securely access private resources hosted on our network from anywhere, without exposing them to the public internet. However, just in case, I isolated my Raspberry Pi on a separate SSID from my home network. I also binded the MAC address of PI to an IP addresses to prevent ARP spoofing and attacks.
The connection with cloudflare-tunnel works like this:
 .
.
-
Updating nameservers of my domain from AWS to Cloudflare I have an option of transferring my domain to Cloudflare, but at this time, I am just going to move nameserver from AWS to Cloudflare. It is a requirement if I want to use Cloudflare Zero Tunnel. The first step is to create the cloudflare account, add the domain name to cloudflare. Cloudflare will find and import DNS records. It also creates a DNS zone on Cloudflare, assigning two default nameservers. Once I have cloudflare nameservers, I need to update the nameserver of my domain in AWS. In order to do that, I headed to Route 53 > Registered domains > boring-is-good.com and selected Edit name servers. I removed default aws name servers and added 2 cloudflare name servers. That's it. Note: when registering a domain name with Route53 Registrar, it created an AWS Hosted Zone, for managing the records for domain name, now that, we are moving records management to Cloudflare, we can delete AWS Hosted Zone. There is also a NS record in that AWS Hosted Zone, but changing the values there will not update the name server for the domain. We have to update it through the domain name. Once done, we can check if the nameserver is updated with
whois boring-is-good.com -
Installing a Cloudflare Tunnel Connector with Docker I haven't installed docker on my Raspberry Pi. Let's start with it. In the terminal,
This command will pipe the script directly into the command line. Typically, it would be best if we didn’t do this; however, Docker is a trusted source. Then, we add our current user to the docker group by usermod command.sudo apt update sudo apt upgrade curl -sSL https://get.docker.com | sh
We can test if our docker is working bysudo usermod -aG docker $USER
This command fetch hello-world image from the docker hub, and run it as a docker container. After printing "hello from docker" message, this container exists on its own. We can clean up the container and image by issuingdocker run hello-worlddocker rm <container-id> docker rmi hello-world -
Configuring the cloudflare tunnel Now that we have docker installed on pi, we can continue with cloudflare tunnel. First, we have to create a tunnel, I am going to use the dashboard because this is my first time and it is easier with GUI. There are three tabs to the tunnel: Overview | Public Hostname | Private network.
Under Overview, we give name to our tunnel and we can choose the Operating System where cloudflare tunnel will be hosted. And of course, I choose docker. I would need to setup a script or docker compose to restart the docker container in case something interrupts and docker service shut down. The command for installation of a cloudflare tunnel docker looks like this:
I run the command by adding '-d' as I want the docker to run it in the background, and docker image is fetched from the hub, and now I have cloudflare tunnel docker up and running in my Pi.docker run -d cloudflare/cloudflared:latest tunnel --no-autoupdate run --token <token>
Under Public Hostname, we can add the hostname to be associated to the tunnel. I added my domain "boring-is-good.com" and specified the service as http://[ip-address]:5000. This means cloudflare tunnel is going to talk to [ip-address]:5000 on Pi. This configuration created a CNAME record in the DNS setting. I can use IP address of my Pi because it is static. Anyway, this IP Address is not exposed to the Internet because of Cloudflare Tunnel. And of course, my site would also need to be running on the Raspberry Pi.
With that, my website is LIVE on my tiny Pi on my home network. Best of all, there is no monthly service fee. Me out. 🍓